Friday, July 17, 2009

How to Make a home-made pinata out of a paper bag

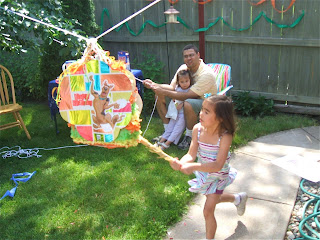
My friend from Costa Rica taught me how to make this home-made pinata using a Target brown paper bag, a poster board,  a Mylar balloon, tape, Elmer's glue, crepe paper(streamers), staples, and string. 


On my second pinata, I made the character cardboard cut-out a little smaller so that more of the colorful crepe paper and paper bag would be exposed to make it easier to break open.  


First you need to find a pot lid or a bowl lid that is the exact size you want your character cut out to be in the front and back of the pinata.  It can't be bigger than the Mylar balloon.  (Make sure you get a Mylar balloon that has two sides or you will need to buy two balloons so you have a picture for the front and back).  Cut the balloon around the edge to separate the balloon back and front.


Cut out a small semi-circle from your poster board.


Trace your lid two times on the poster board so that you have two large circles.  (You may need two poster boards depending on the size of your lid you are tracing and the size of the poster). Then, using the small semi-circle, trace a scallop edge on the inside of your circle.  I used a smaller scalloped edge, but you can make your semi-circle any size you want for a larger scallop. (See the Scooby Doo pinata at the top for a larger scallop look).


Cut out both of your scalloped circles and place on the back of one of your Mylar balloon halves.  Wrap the balloon around the scalloped edges and tape down.  Pull tight so that the front of the balloon doesn't wrinkle.


In the inner part of your scallops you will need to cut a small slit to allow you to tape the balloon flat around the curved edges.


Tape around the the whole cut out.


Repeat the process so that you have two balloon-covered poster cut-outs when you are done.  Making these cut-outs can be time consuming, so you may want to break up the project and make the cut-outs one day and then proceed to the next step of decorating the bag with crepe paper another day.  Another quicker option is to buy large paper plates featuring the character of your choice and use those as your cut-outs for the front and back of the pinata instead of making your own with the balloon.  The only draw back is that the paper plates are usually pretty small.


The next step is to staple a piece of twine or string along the outside of the bag to help hold the weight of the candy.


Start at the top of one side, bringing the string around the bottom of the bag and to the top of the other side of the bag.  Staple at the top and bottom of each side of the bag.


Staple a second piece of string next to the first, going under the bottom of the bag and to the other side, so you have two pieces of string running along the sides and under the bag a few inches apart.


Next, wind you crepe paper around and around until you have a 9 inch wide flat stack of crepe paper.


You are now going to cut the decorative fringe by starting at the two ends.  Find the center layer and carefully put your scissors through the loop and snip 2/3 of the way to the top of each folded end.


Then finish cutting the fringe by cutting through all the layers 2/3 of the way to the top spacing your cut a little less than an inch apart.


Now you can start gluing the the crepe paper to the bag, starting at the bottom of the bag and working your way up.


If you are using several colors of crepe paper, glue down two rows of each color all the way around the bag and then proceed to the next color.  Continue this pattern all the way to the top.


I left a little bit of the bag exposed where the poster cut-out was going to be placed.  


Put some tape on the back of each of the cut-outs and tape in place on the front and back side of the decorated bag. 


Then staple in place as far as your stapler can reach on the sides and top of the cut-outs.


Tie the string together at the top where the handles meet to help reinforce the weight of the candy when hanging and to prevent the handles from breaking.


To decorate the bottom of the bag I just glued long strips of the leftover streamers (not the fringed cut pieces) on the bottom, scrunching them up to make a textured look as I glued it down.


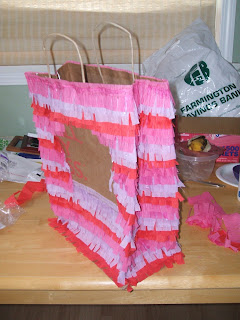
Place the candy into the bag once it's completely dry and then staple the top of the bag shut.  You can add curly ribbon to the top to finish it off (see the scooby doo pinata at the top).

Wednesday, May 6, 2009

Vacation from blogging

Sorry that I have not posted new ideas for a while; I enjoyed my vacation from blogging too much!  Unfortunately, I have no interest in starting back up again any time soon.  Now that the weather is warming up, I am having fun being with my kids outdoors and doing other kinds of activities.  I might begin posting again in the fall, but I don't want to make any promises.  I started the blog knowing that it would be a temporary thing for me.  I have been able to put the time into doing it because of my present stage of life (one child in school and one preschooler at home who still naps); but I am anticipating several changes to my present circumstances (my soon-to-be 3 year old is really fighting taking naps these days, my 5 year old will be out of school soon for the summer, and I am thinking about having baby #3).  I hope that this blog has served you well (even if for just a short time), and that I have helped, in some small way, spark a love for reading with your children and an excitement for learning.  Sincerely, Amy R.  

Wednesday, April 8, 2009

Sorry--No Easter Week 2

Hi everyone.  I'm sorry but I will not be able to post this week.  I intended to do another week of Easter ideas for you, but I am leaving on a trip today to visit family and just haven't had any time to do it before I leave.  I will not be posting again until April 27th.  I wish I was so on top of things that I could do advance postings and have them ready to go while I am gone;  but I am not that organized.  :)   Hope you all have a Happy Easter!!!!

Tuesday, March 31, 2009

Easter/Spring- week1

Book Ideas:
Owen’s Marshmallow Chick by Kevin Henkes
"Oh what joy it is Easter morning and Owen's basket is full. He can't wait to start enjoying all of the goodies. Among his favorites are the jellybeans, which he promptly devours, then the gumdrops, next the butter cream eggs and another favorite, the chocolate bunny. There is only one item left, a yellow marshmallow chick that looks just like his fuzzy yellow blanket. Owen plays with his chick all day and when evening comes, he puts it on his shelf with a sweet kiss goodnight. After all, it really is his favorite Easter treat."


Five Little Chicks by Nancy Tafuri
This little chick went to the garden.
This little chick found a worm.
This little chick eyed a berry.
And this little chick gave a squirm!
With counting, fun, and vibrant illustrations, acclaimed storyteller Nancy Tafuri brings the farmyard to life.


The Surprise Visitor by Juli Kangas
One morning, Edgar Small discovers a blue, speckled "roundish thing"-an egg-on his front step. Who could it belong to? Edgar visits several animals, but the roundish thing does not fit in with any of them. All of the animals are willing to help, though, and they decorate the egg to make it more attractive. With a coat of fresh yellow paint, a smiling face, and a big bushy tail, the roundish thing is looking quite handsome-but when the egg finally reunites with its mother, will she recognize it as her own?


Arthur’s Jelly Beans by Marc Brown
Arthur wins the jelly bean hunt at Muffy's Spring Fling party in an unexpected way.


Last One in is a Rotten Egg! by Diane deGroat
Gilbert and Lola are excited that their cousin Wally is coming to help with the Easter egg hunt in the park. But when Lola finds the prized golden egg high up in a tree and asks tall Wally to help her retrieve it, Wally claims it for himself. But Gilbert finds a way to set things right.


The Grumpy Easter Bunny by Justine Korman
Hopper does not share the other rabbits' enthusiasm for their Easter rounds and instead of hiding his share of goodies, he eats much of them himself, before learning the real joy of Easter.


Activity Ideas:
Idea #1: Edible Nests

Read one of the book titles about chicks or birds ("Owen's Marshmallow Chick", or "Five Little Chicks", or "The Surprise Visitor") and then let your child build their own tasty bird nest.
You'll need some chocolate chips, La Choy crunchy ChowMein Noodles, gummy worms, jelly beans, and a marshmallow chick.
All you do is melt some chocolate chips in the microwave and then dump in some chowmein noodles and stir until their coated in the chocolate. Then spread the chocolate covered noodles out on a tinfoil or wax paper lined plate and stick it in the freezer for a few minutes. Then let your child press the noodles into a nest shape and decorate with the candies.


Idea #2: Crayon Resist Egg
Read one of the stories and then design your own Easter egg using heavy white paper, crayons, and watercolors.


Draw a large oval, using a crayon, on a piece of white cardstock or construction paper.


Have your child draw whatever designs they want, using crayons. Remind them to press hard so that the crayons will show well after they add the paint.


Next, let them paint with watercolors right over the top of their crayon designs.


When done, set aside and dry. Once dry cut out the egg. Here is an example of a two year-old's work and a five year-old's.


Idea #3: Toilet Paper Roll Rabbit

Read one of the stories and then make this fun little Easter Bunny.


Here are the items you'll need to have ready, as seen in the photo:
1 toilet paper roll
2 large back leg cut-outs
2 small front leg cut-outs
Bunny ears
Circle- for bunny head
Googly eyes
pink nose
1 cotton ball
(I just drew the body pieces onto cardstock paper)
Let your child assemble the head first. Glue the ears to the back of the circle. Then let them glue the eyes and nose to the face and draw on their own whiskers and mouth, however they want.


Next, squeeze glue around the rim of one of the toilet paper roll ends and place the head on top.


Then, glue on the front and back legs and the bunny tail. Set aside to dry.


Idea #4: Jelly Bean color sorting and counting

Read "Arthur's Jelly Beans" and then practice counting and sorting jelly beans by colors.
Ask your child to group all the greens together, and all the yellows together, and so forth... then count up how many are in each group. Make a guess which has the most before counting them. Count how many jelly beans their all total for practice counting in the double digits. These are all important skills to practice before going to school.
Idea #5: Egg Hunt
Read one of the books and then, using plastic eggs, send your child on an egg hunt. Hide some eggs around the house and have your child find them. This is a great activity to reinforce colors or counting. You could have your child find a specific color of egg or find only a specific number of eggs to see if they can keep track and count on their own.


Monday, March 23, 2009

Wind/Kites

Book Ideas: The Wind Blew by Pat Hutchins
The wind blew, and blew, and blew! It blew so hard, it took everything with it: Mr. White's umbrella, Priscilla's balloon, the twins' scarves, even the wig on the judge's head. But just when the wind was about to carry everything out to sea, it changed its mind!

Someone Bigger by Jonathan Emmett
Sam's dad says that he is too small to fly their new kite, but when Dad, the postman, a bank robber, and some zoo animals get pulled up into the sky, only Sam can save them.


One windy Wednesday by Phyllis Root
When the wind blows so hard that it blows the quack right out of the duck, the oink out of the pig and so on, Bonnie Bumble works hard to get each animal's sound back where it belongs.


Elmer Takes Off by David McKee
On a very, very windy day Elmer, the patchwork elephant, assures all the other animals and birds that nothing could ever blow him away.


Kite Flying by Grace Lin
A girl describes how her family makes and flies a kite.


The Kite Festival by Leyla Torres
One Sunday morning, Fernando Flórez, his parents, grandparents, and sister head to a random destination for an outing--San Vicente. When they arrive in the center of the town, they see many people preparing for a kite festival. The Flórez family waste no time joining in the fun. Unfortunately, all the stores are closed, so buying a kite's out. But by using their ingenuity--along with found objects--they successfully put one together.


Activity Ideas:
Idea #1: Blow Art
Read one of the stories and talk about how we can't see the wind, but we can see it move things. Then pretend to be the wind and paint a picture using your breath and a straw.

Water down some tempera paint until it is really runny. Then drop some of the watered down paint on a piece of paper.


Give your child a straw and let them make designs and mix the colors by blowing the paint with their breath. If you worried about them accidentally sucking up the paint, you can make a small hole in the side of the straw that will make it hard to suck up the paint, but will still allow them to blow the paint.


Idea #2: Cotton Ball Race
Read one of the stories and talk about how we can't actually see the wind, but we can see the effects of the wind move things. Pretend to be the wind and have a race to move a cotton ball with your breath, using a straw.
Build a maze with some blocks or legos. Create a start and finish line and have your child blow a cotton ball through the maze using their breath and a straw. Another variation of the game is to set the cotton ball on the floor and see who can blow the cotton ball the farthest with one breath, or see who can blow the cotton ball from one side of the kitchen table to the other first.


Idea #3: Kite Roll and Color Game
Read one of the stories and then play this dice and coloring game.

You will need to print-off the kite coloring sheet, first. Then roll the dice and color the corresponding number on your game sheet. Whoever gets their whole kite colored first wins.


Idea #4: Kite Math Matching
Read one of the stories and then play this number matching game.
First, you will need to print-off the kite matching cards. Then cut them out and have your child match the numerals at the top with the correct number of kite tail bows.


Idea #5: Fly a kite
Read one of the books and then go fly a kite together. If you don't have one and want to make one together, here is a good tutorial on how to make a simple home-made kite that your child can decorate.

Idea #6: Wind Observational Drawings
Read one of the books and discuss how you can't actually see the wind but that you can see it move things. Go outside with some paper and a pencil and observe signs of the wind moving things. Draw the objects you see moving in the wind. Make sure to help label your child's drawings.